1965 Jazzmaster Clone...

Painting? Routing? Set-up tips? Or just straight-up making a guitar from scratch? Post here, and post pics!

Moderated By: mods

User avatar
fullerplast
.
.
Posts: 173
Joined: Fri Apr 04, 2008 2:52 pm
Location: In My Room...

1965 Jazzmaster Clone...

Post by fullerplast »

Here's the beginning of AP65... a fiesta red relic B&D '65 clone.

What you see here is the result of just two days work... breaking all the "rules and traditions" (ie. no rule of threes, no wetsanding between coats, no waiting period between colors, no grainfill (which is very obvious without the clearcoat).

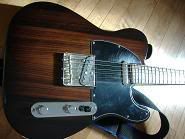
Here is the aftermarket CBS head B&D neck from Flexguitars.com in Singapore. They are easy to deal with and ship quickly, its not a scam. The neck is said to MIJ and carries the same part # configuration as Allparts necks (also MIJ). When I ordered, it was displayed as STR65B but now, only a few weeks later, its advertised as NSTR65B... and the pics look finished. If the numbering scheme is indeed the same as Allparts, the N would stand for nitro. I wish I had waited! Anyway, it appears to be of reasonable quality and I'm happy with it.

I'll let the pics do the talking:

Image

Image

Image

Image

Image

I got started on the neck right away:

Image

Then turned my attention to the body. As I want this project to look realistic, I had to do something about the Allparts stamp. I decided to fill it.

(Note the crappy neck pocket, not a big deal to fix but disappointing):

Image

One coat:

Image

Then two:

Image

I wasnt sure how the filler would take the yellow dye, more on that later. Other pics of the body:

Image

Image

Image

I have mixed feelings on the body. It was made in USA, but there was alot of fuzz from the router left over and the neck pocket shape needed alot of filing and sanding to be correct at the lower edge. The good news is... the bridge pickup route lines up with the pickguard UNLIKE a previous Allparts body I had. The other body was ash, this one is alder. I dont know if that was the difference, or if they've switched vendors. At any rate, the ash body with incorrect routing did NOT have Made in USA stamped on it like this one does.

I put some grain filler only on two knots:

Image

Paint. This is ReRanch Coral. It doesn't look like Coral to me. It looks like Fiesta Red. Their Fiesta looks way too dark for my eyes. This looks more like the FR that I've known and loved. I'm glad it went with it. Another thing to note, it doesn't shine like most nitro I've used. It will definitely HAVE to be clearcoated. Even though I'm building a well-worn '65, I want to start out with a decent job. So what you see here is NOT yet clearcoated. I'm going to try to keep my mitts off it for a week or so and let it cure.

Image

Image

Image

Tinting the neck. I taped off the heel for two reasons, one.. so it looks untinted where it sits in the body and two.. so I can put it in the vise and paint all sides.

Image

Image

While that was drying, I sanded the body and put it in a tub of yellow dye:

Image


The neck pocket came out OK. Anyway, half of it will be painted over.

Image

A few markings for historical sake, including the infamous "screwdriver mark"...

Image

And the stick...

Image

Finally the primer:

Image

Image

And finally the Coral... er, I mean Fiesta:

Image

Image

Image

Image

Image

I like the look of the neck pocket:

Image

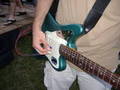
And I couldn't resist a few neck-on shots this morning:

Image

Image

Image

Other parts on hand include a silkscreen logo, AVRI Gotoh tuners, pickup covers, repro bridge cover with bent ends and rusty, vintage bridge, string tree, switch, and strap buttons, a piece of brass shielding, NOS witch hats, TUSQ nut, and bridge cups. I also want a white guard I can age myself (dont like the RI mint green), the rest of the shielding, and some quality new pickups and pots.

Image

Not bad for two days of work. I can get alot done when I call in sick to work! :shock:

Stay tuned!

8)
Last edited by fullerplast on Sat Aug 09, 2008 2:31 pm, edited 1 time in total.
User avatar
fullerplast
.
.
Posts: 173
Joined: Fri Apr 04, 2008 2:52 pm
Location: In My Room...

Post by fullerplast »

Those who have also been on the offset forum for awhile might remember I started this project months ago with all vintage parts. However I couldnt find a vintage B&D neck and ended up with a '66 B&B neck and then switched the pots and pickups to match... ... and the color turned out to be IBM instead of FR along the way (Pontiac engine paint that I had on hand).

Image

Image

I really liked it but never forgot the '65 B&D idea. The '66 is no longer with me, so I reverted back to the original idea. Only this time... the bulk is aftermarket parts with a few exceptions, most notably the bridge (which cant be faked) and some hardware that I already have on hand. I'm keeping tabs on what this costs me and I'll let you all know in the end. It should be WELL under an AVRI, which doesnt come in dots and binding anyway..
User avatar
Mike
I like EL34s
Posts: 39159
Joined: Thu Apr 20, 2006 8:30 am
Location: Edinburgh, Scotland
Contact:

Re: 1965 Jazzmaster Clone...

Post by Mike »

fullerplast wrote:I have mixed feelings on the body. It was made in USA, but there was alot of fuzz from the router left over and the neck pocket shape needed alot of filing and sanding to be correct at the lower edge
The country of origin really doesn't have anything to do with the quality of workmanship. For example, I would buy a Japanese Car over a British one all the day long.

Anyways, cool project. Does that place to B&B necks? I know people here would be really interested in that.
User avatar
rrrob9
.
.
Posts: 83
Joined: Thu Jun 26, 2008 3:10 pm
Location: London
Contact:

Post by rrrob9 »

Wow, looks fantastic. The neck binding is fucking lush.
User avatar
fullerplast
.
.
Posts: 173
Joined: Fri Apr 04, 2008 2:52 pm
Location: In My Room...

Post by fullerplast »

Yeah... the country of origin generally doesnt indicate quality, especially in these days of C&C. I do find it irritating though, that they would let it out the door like that. The route between the pickups is awful too, you can see it in one of the shots.

No, Flex doesn't have B&B necks on their website. Actually, for us long-scale Jazzmaster bastards... the B&D neck is much more desireable as it was only made for less than a year. The Allparts B&D neck has the small Strat-shaped head which guys have added a wing to and cut it in a Jazzmaster shape. So this neck is like the holy grail for many of us who can't make our own necks...

Flex Guitars

The neck was $138 when I bought it and was sealed, but not finished. Now it looks to be nitro and tinted... but it's $195 USD.

:shock:
User avatar
ludger
.
.
Posts: 316
Joined: Mon Aug 28, 2006 11:19 pm
Location: ontario

Post by ludger »

Lookin' good. I really like that IBM.

I looked everywhere for one of those bound necks with the fat headstock. I lose at teh internets.
Image
User avatar
TheBurbz
.
.
Posts: 776
Joined: Tue Feb 12, 2008 9:28 pm
Location: Tyne and Wear, UK

Post by TheBurbz »

That colour is beautiful. You don't hang about, do you?

When you painted the headstock, how did you mask the edge beyond the nut? I painted a neck using two different types of tape, both left a furry edge to the paint just behind the nut, maybe it was the grain of the rosewood.
Are you a Wizard?
User avatar
fullerplast
.
.
Posts: 173
Joined: Fri Apr 04, 2008 2:52 pm
Location: In My Room...

Post by fullerplast »

I always tape right up to the rosewood, then when I clearcoat... i go all the way to the nut. That eliminates the tape line, especially with some very light wet-sanding.
User avatar
James
Nutmeg
Posts: 10645
Joined: Thu Jul 13, 2006 6:15 pm
Location: Boxingham Palace

Re: 1965 Jazzmaster Clone...

Post by James »

fullerplast wrote: Then turned my attention to the body. As I want this project to look realistic, I had to do something about the Allparts stamp. I decided to fill it.

(Note the crappy neck pocket, not a big deal to fix but disappointing):

Image
I don't understand this. At all.
Shabba.
User avatar
fullerplast
.
.
Posts: 173
Joined: Fri Apr 04, 2008 2:52 pm
Location: In My Room...

Post by fullerplast »

you mean how crappy it is... or why i filled in the stamp?
User avatar
James
Nutmeg
Posts: 10645
Joined: Thu Jul 13, 2006 6:15 pm
Location: Boxingham Palace

Post by James »

Why you filled it.
Shabba.
User avatar
fullerplast
.
.
Posts: 173
Joined: Fri Apr 04, 2008 2:52 pm
Location: In My Room...

Post by fullerplast »

authenticity.

i find it challenging to duplicate the original look inside and out.
User avatar
Aeon
.
.
Posts: 497
Joined: Fri May 04, 2007 5:52 am
Location: Pennsylvania

Post by Aeon »

Looks good. However, I know now not to order bodies from there, I'm surprised they let it out with the neck pocket looking like that. As you said, not a big deal, but kinda upsetting.

Looking forward to how you finish it!
User avatar
fullerplast
.
.
Posts: 173
Joined: Fri Apr 04, 2008 2:52 pm
Location: In My Room...

Post by fullerplast »

Looking forward to how you finish it!
Thanks... I'll keep the thread updated but i blew alot of my gear fund on the CIC Duo and it may be awhile before I can get everything I still need...

:cry:
User avatar
freekandy
.
.
Posts: 95
Joined: Tue Jan 15, 2008 4:45 am

Post by freekandy »

whats the point of dying it before primer/paint?
jaguars :)
User avatar
DGNR8
.
.
Posts: 4220
Joined: Sat Sep 30, 2006 2:51 am
Location: DC Area

Post by DGNR8 »

Oh, I say. That is elegant. I would still be compelled to use Fiesta. But they should put you in charge at Fender. I understand the corksniffing part. If I cut a corner or have imperfections, etc. I have to change it or get rid of it. I have no problems with chips and sand-throughs though.
Yell Like Hell
User avatar
tribi9
Administrator
Posts: 789
Joined: Tue Jan 15, 2008 11:14 pm
Location: Canada

Post by tribi9 »

Nice project! :)
User avatar
fullerplast
.
.
Posts: 173
Joined: Fri Apr 04, 2008 2:52 pm
Location: In My Room...

Post by fullerplast »

freekandy wrote:whats the point of dying it before primer/paint?
That's just the way they were originally done. The yellow served as the base of the sunburst, and since they didnt know which ones would be custom colors at the time of the cutting the body, they dyed them all.

I think it looks cool when it wears, where you can see the finish, the white, the yellow and then the wood.

This is super-thin... I left off the grainfiller and sanding sealer, so it should wear really nicely. I'm gonna cause some nitro checking and maybe intentionally polish through a few areas, but I'm not gonna drag it behind my truck or anything...

:D
User avatar
Fran
The Curmudgeon
Posts: 22219
Joined: Thu Apr 20, 2006 5:53 am
Location: Nottingham, Englandshire.

Post by Fran »

Nice work dude. I would have put a Kahler trem on it though.. :D
User avatar
fullerplast
.
.
Posts: 173
Joined: Fri Apr 04, 2008 2:52 pm
Location: In My Room...

Post by fullerplast »

HAHA! Yeah... and routed it out with a srewdriver and hammer for some hambackers....

:lol: