Page 2 of 3
Posted: Fri Sep 16, 2011 5:56 am
by iCEByTes
Dave wrote:Nice one Icey! Many thanks!
Have you had any luck with a new pickguard yet? I've been on a mint guard quest myself - updates soon...
no : ( not found nobody can make it for me.
and stills in doubt Mint or Pearloid.
maybe i make both and compare on self guitar.

if discover someone that can make i am interested
Posted: Mon Sep 19, 2011 11:20 pm
by Dave
Icey - I'm waiting on some mint and parchment samples from Sims guitars in the UK. There's a Mint guard by Jeannies on US ebay but to be honest I, and many others, have had bad experiences of them so i'm not going there. Sims will be more expensive but I can send my guard to them and they will cut it exactly for just shy of the 50 mark. Jeannies would cost not far off once postage is taken into account and then more if import tax is charged. Plus the possible agro of it not being exact isn't worth saving a few pounds. When i get the samples through I'll post em up.
Posted: Tue Sep 20, 2011 3:44 am
by iCEByTes
superrr
if you can fix the gaps would be awsome.
Posted: Tue Sep 20, 2011 9:34 am
by Dave
iCEByTes wrote:superrr
if you can fix the gaps would be awsome.
Gaps around the lipsticks? That's one concern I have about the Lippy humbucker - big ugly gaps around it in a normal HB route.... Maybe I'll see if I can get it cut to follow the shape of the two tubes.
I'm going to round off the lower horn bit too as it's the pointiness that makes it look a bit odd on the JS - not so much the lower curve which actually reflects the curve of the control plate.
Before and after:


Posted: Wed Sep 21, 2011 7:13 am
by iCEByTes
gaps on my pickguard :

Uploaded with
ImageShack.us
i mean mine. if could find someone for make and send me an fixed. one.
Posted: Thu Oct 06, 2011 12:14 pm
by Dave
Got through my new PG - excellent service and worksmanship by SIMS guys:
Here's a mock up. Nearly ready to get it wired and ready. Not sure if it's too anaemic looking so maybe black knobs, switch and stang swiches..maybe


Posted: Thu Oct 06, 2011 12:24 pm
by lorez
i like the white knobs and don't think it looks aenaemic at all
Posted: Thu Oct 06, 2011 12:30 pm
by Thom
Looks hot! Love the lipsticks with the trem and control plate.
Posted: Thu Oct 06, 2011 2:39 pm
by iCEByTes
looks good
but that red
i would go Fibercarbon pickguard or Black or red tortoise.
i dont like gibson switches , i can do same whiit small switches so i find it unnecessary routing.
Posted: Thu Oct 06, 2011 3:11 pm
by Dave
Thanks guys!
Icey - my 'inspiration' for this is deliberatey retro and black PG is too punker for me - this is where I'm coming from

:
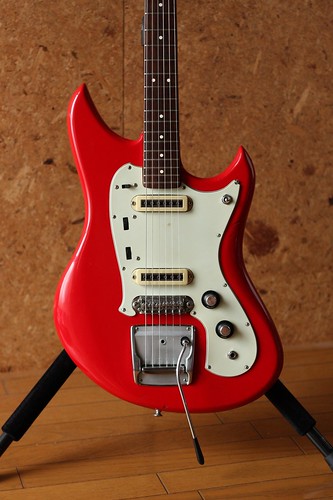 Yamaha SG-2 1967
 by
osamu ito, on Flickr
In fact a part of me wanted to subvert the quirky punkerness of the JS and turn it into a more refined looking instrument. I'm toying with an amber switch tip as the ultimate FUUUUUUUUUUUUUUUUUUUUUUUU to the world
Posted: Thu Oct 06, 2011 4:38 pm
by iCEByTes
ahhh a vintage style.
btw if find dificult in keep in tune the bridge
try find Mad-Mike Mustang bridge guide.
is a Bibble how keep that shit in tune. its works like magic
here is :
http://www.jag-stang.com/forum/topic/92 ... hammy-use/
Posted: Fri Oct 07, 2011 11:37 am
by Dave
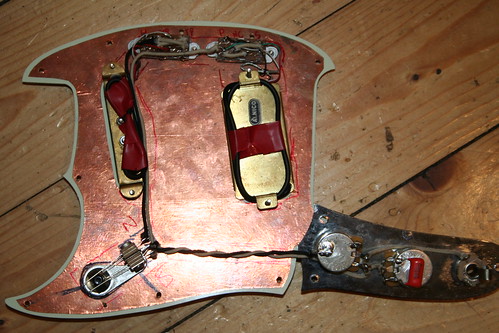
OKAY! Wiring guidance needed as in, please tell me what to do from beginning to end!! If anyone could be so kind as to draw lines on the picture below that would make life awesome again:
Stang switches: 1 = series, off, split. 2 = Phase, off, out of phase
3way = Humbucker, Both, Single coil,
1 tone, 1 volume (500k)
orange drop cap

One consideration is the whole cavities and guard are shielded so given whatever schematic is used I'm unsure as to how the components interact with the shielding re: grounding etc - so where is it okay to have the parts and pups making contact with the shielding and where should I remove the shielding - like around the pots might be an example, or the pup screws. And grounding - I've retained the bridge thimble ground wire.... I'm way out of my knowledge zone here
Posted: Sat Oct 08, 2011 3:17 am
by iCEByTes
Dave wrote:OKAY! Wiring guidance needed as in, please tell me what to do from beginning to end!! If anyone could be so kind as to draw lines on the picture below that would make life awesome again:
Stang switches: 1 = series, off, split. 2 = Phase, off, out of phase
3way = Humbucker, Both, Single coil,
1 tone, 1 volume (500k)
orange drop cap
One consideration is the whole cavities and guard are shielded so given whatever schematic is used I'm unsure as to how the components interact with the shielding re: grounding etc - so where is it okay to have the parts and pups making contact with the shielding and where should I remove the shielding - like around the pots might be an example, or the pup screws. And grounding - I've retained the bridge thimble ground wire.... I'm way out of my knowledge zone here
posted picture of my switches maybe help whit split series parallel.
original schematic maybe helps you whit the potenciometers them you change at switchs


Posted: Mon Oct 10, 2011 8:35 am
by Dave
Thanks Icey! Is your stang wired for series/split and phase options? I'm wondering if the phase option is a useful option or not - is there other things with running the bucker in series and parrelel as well as split/not split? is that even possible on one hb? Damnit i'm lost in options and lack of knowledge!
Posted: Mon Oct 10, 2011 3:43 pm
by iCEByTes
Dave wrote:Thanks Icey! Is your stang wired for series/split and phase options? I'm wondering if the phase option is a useful option or not - is there other things with running the bucker in series and parrelel as well as split/not split? is that even possible on one hb? Damnit i'm lost in options and lack of knowledge!
my phase off is at an push-pull.
the switchs are neck-both-bridge and split-series-parallel.
man i thinking in open all for a maint.
if i do it i will take more pictures and try make a schematic of that wiring style

Posted: Tue Feb 14, 2012 11:45 am
by Dave
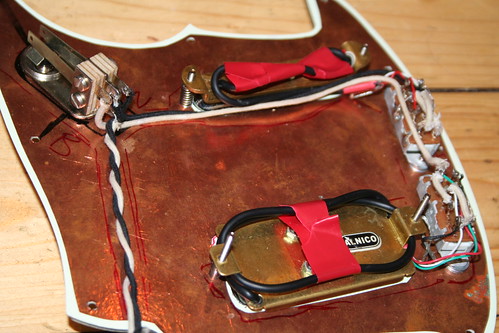
Wiring 90% done! Still got to get some clarification form the good folks at Guitarnutz forum on grounding and shielding but IT WORKS. I'm posting loads of pics in case anyone can spot any issues.
The whole thang:
 IMG_0126
 by
Davemeister23, on Flickr
 IMG_0117
 by
Davemeister23, on Flickr
The control Plate
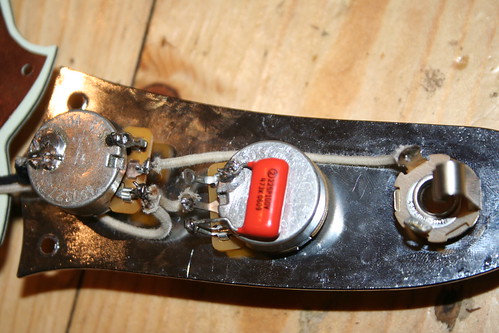 IMG_0116
 by
Davemeister23, on Flickr
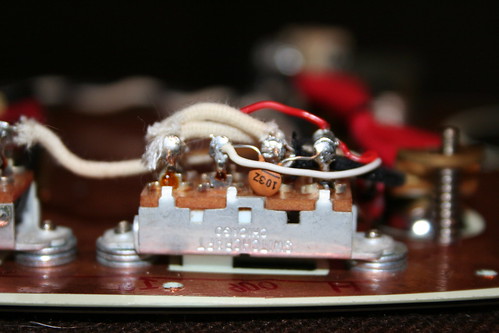
The toggle
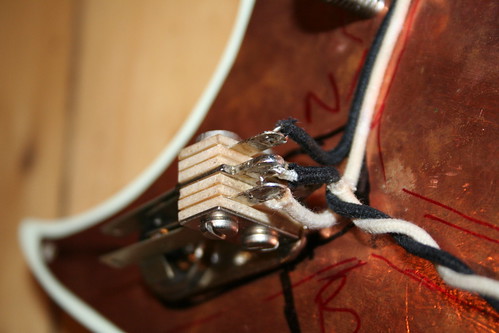 IMG_0118
 by
Davemeister23, on Flickr
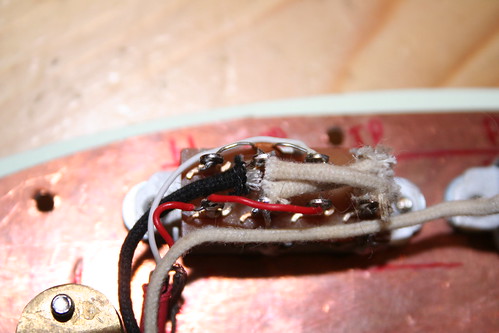
Both switches, one side
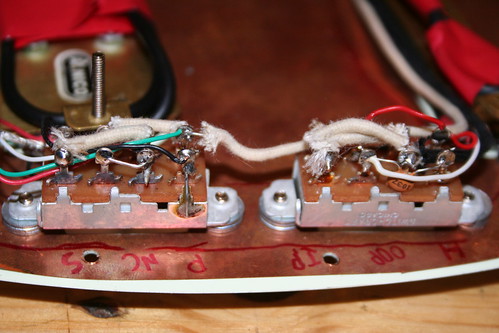 IMG_0121
 by
Davemeister23, on Flickr
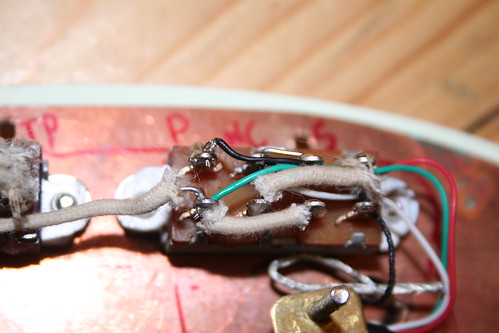
Both switches other side
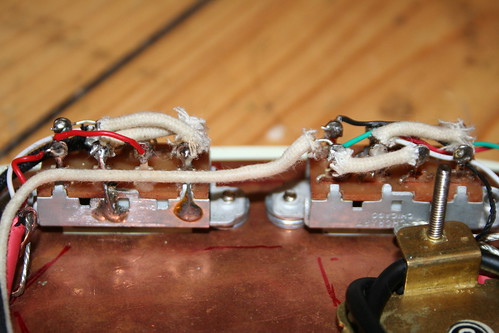 IMG_0122
 by
Davemeister23, on Flickr
Both switches above
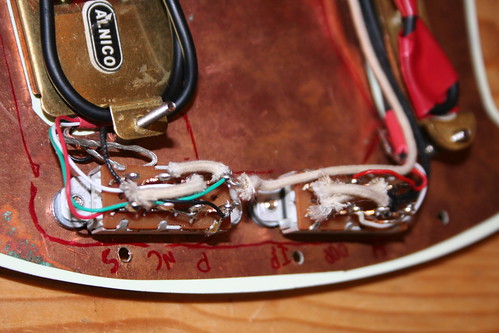 IMG_0119
 by
Davemeister23, on Flickr
SINGLE COIL Neck: IN PHASE, OUT OF PHASE, HALF OUT OF PHASE
 IMG_0131
 by
Davemeister23, on Flickr
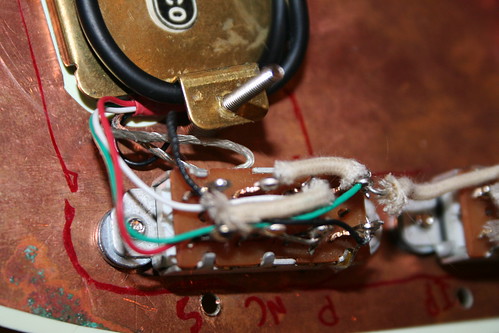
Single coil: other side
 IMG_0123
 by
Davemeister23, on Flickr
Single coil above
 IMG_0124
 by
Davemeister23, on Flickr
HUMBUCKER: SERIES, SPLIT (NORTH COIL), PARALLEL: Above
 IMG_0125
 by
Davemeister23, on Flickr
Humbucker: another angle
 IMG_0120
 by
Davemeister23, on Flickr
The hand routed not yet fully shielded cavity. All fits fine.
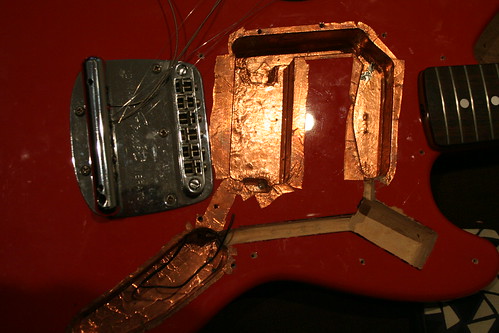 IMG_0128
 by
Davemeister23, on Flickr
Posted: Tue Feb 14, 2012 12:18 pm
by Dave
Oh yah - special mention to EKWatts who kicked my arse into having a shot at this.
Posted: Tue Feb 14, 2012 12:48 pm
by iCEByTes
looks gorgeous m8 , everything extreme detailed , high quality stuff , neat solder joints
superb

Posted: Tue Feb 14, 2012 7:07 pm
by Dave
Cheers Icey!

Posted: Tue Feb 14, 2012 7:59 pm
by Fran
Looking good Dave!


